Overview
This conversion guide walks through how to receive and report on event-based data on reservation attempts and completions (i.e., ‘conversions’) in Google Analytics (‘GA’) and Google Ads (“Ads”) so you can track the true conversion funnel for your online reservation traffic. We have combined our recommendations for Google Ads since its configuration often goes hand in hand with Google Analytics.
ER Express will automatically send event-based data to your GA property. The data is triggered by two events:
- First, the patient reaching the reservation form (the attempt) and then,
- The patient completely filling in the reservation form and clicking submit (the conversion)
To get useful attribution data, you should also implement our Cross-Domain Tracking Guide.
Set-up
Required for GA
There is only one required step: setting up cross-domain tracking. This step enables more precise attribution so you can measure conversion volume and conversion rate volume by source (e.g., Google organic traffic vs. paid traffic). See ER Express’ separate Guide for Cross-Domain Tracking.
Required for Ads
This step is required *only* if you create your conversions in Ads. If you create a Goal in GA and then pull it in Ads, you do not need to do anything further.
Step 1: Open up Google Ads and click on Tools & Settings at the top (wrench icon).
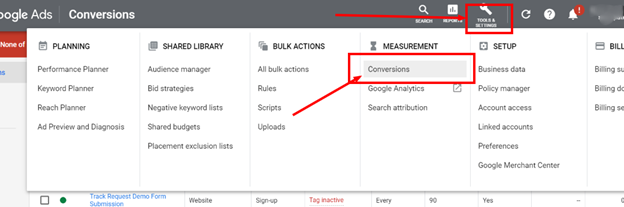
Step 2: After you click on Conversions, you will see a list of your conversions (you may have one or you may have many).
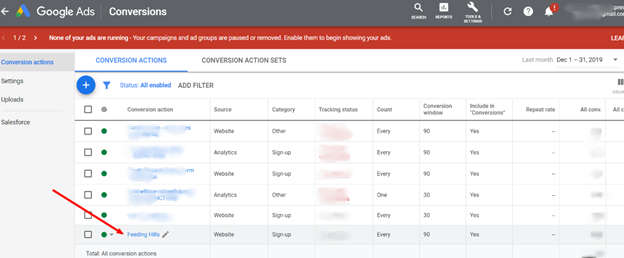
Step 3: Select the name of the conversion you want to use in the table view and click on it – it will take you to a page that looks like this:
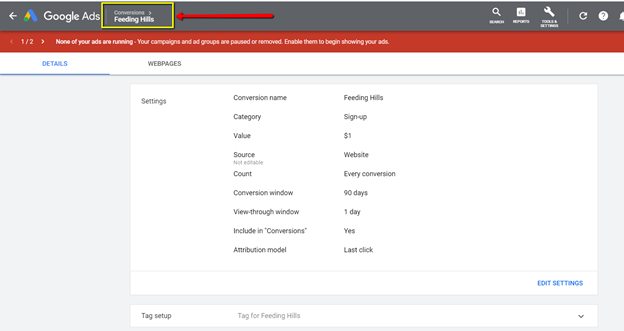
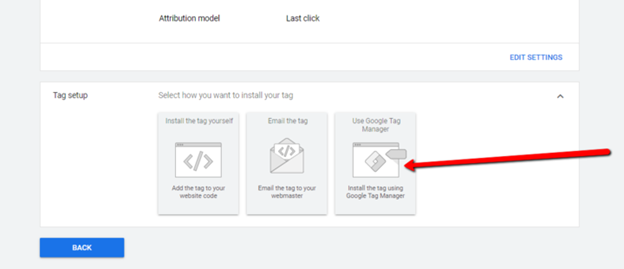
Step 4: Expand the tab for Tag setup (you may need to zoom out or scroll down vertically).
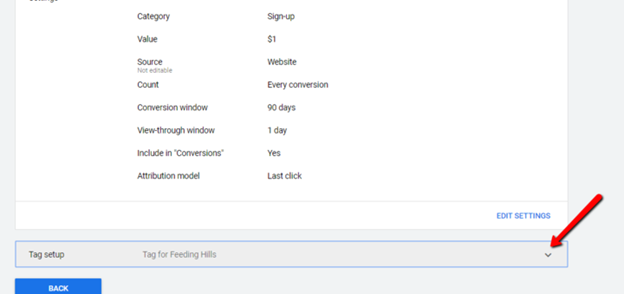
Step 5: Click on ‘Use Google Tag Manager’ button.
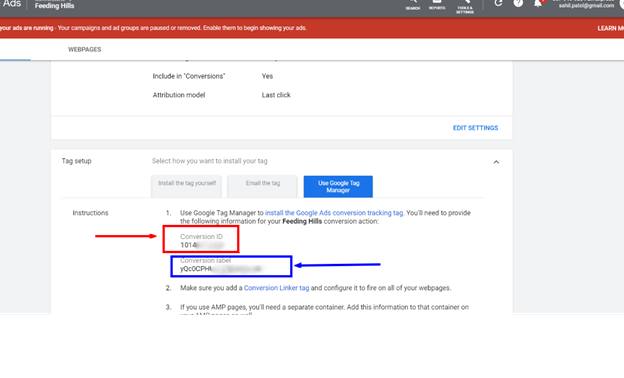
Step 6: Conversion ID and Label should be listed below like this:
Creating conversions in Ads vs. GA
Although agencies prefer to create conversions by setting a Goal in GA and then importing into Ads, we do not recommend it.
Creating conversions in Ads gives you better attribution.
This article gives the best explanation: https://bounteous.com/insights/2016/02/03/differences-between-adwords-conversion-tags-google-analytics-goals-import/
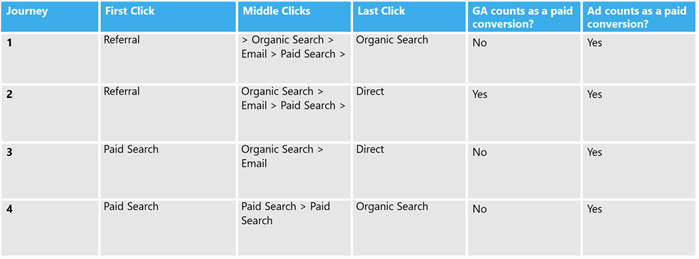
What do we mean? Importing from GA will likely result in undercounting your conversions from Ads. It will *not* change your overall number of conversions, but it will attribute fewer of them to Ads (and conversely, more of them to organic). As a result, you will artificially skew your cost per paid conversion higher than it should be.
This happens because GA relies on the last click attribution model. So if the user clicks on one of your Ads and then clicks elsewhere and then clicks back in to make a reservation, it will NOT count as a paid conversion.
On the other hand, Ads count any conversion that includes a click on your ad, whether it occurs at the beginning, middle, or end of the digital journey.
In the four patient journeys below, ONLY # 2 would get imported from GA to Ads as a paid conversion.
In addition, some agencies have found that importing from GA does not consistently attribute conversions to the correct campaign, but we have not replicated this issue.
Optional
We recommend, but do not require, several optional steps that can improve reporting.
-
Creating a dedicate property ID
-
Creating preset custom reports
See below for more details
Steps we do NOT Recommend
-
Creating custom dimensions
-
Creating custom metrics
-
Creating Goals
Reporting
Ad hoc reporting – if you periodically want to measure results
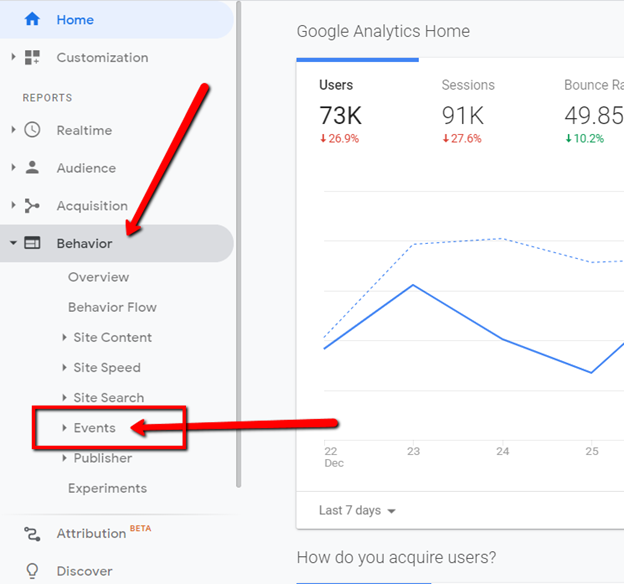
Step 7: Go to Behavior > Events
Step 8: Click on Top Events.
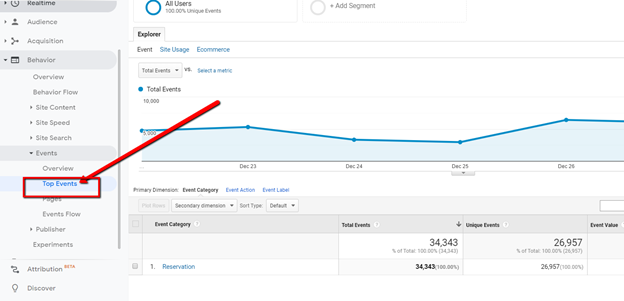
Step 9: Search for the event category 'Save my Spot'.
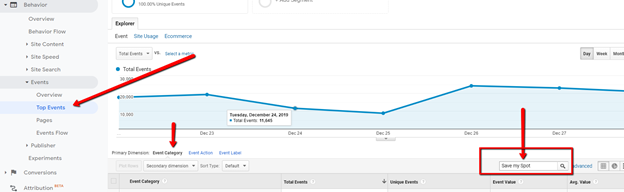
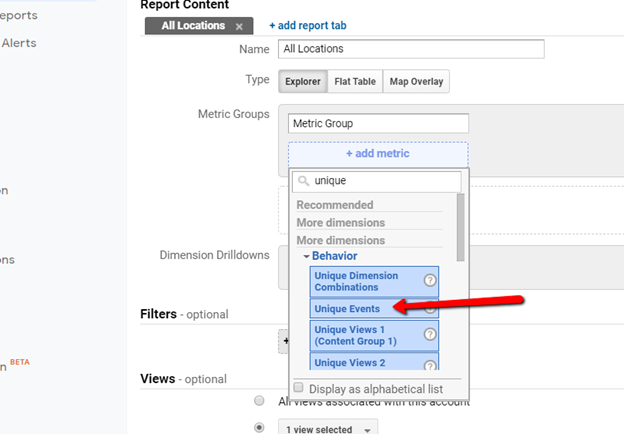
Step 10: You will see two events – these metrics will give you the raw data you need to calculate overall conversion rate. Remember to use Unique Events, NOT Total Events.

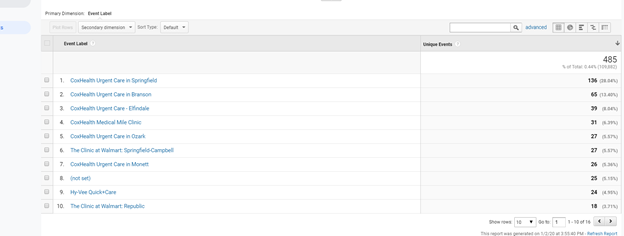
Step 11: If you want to calculate conversions by location, use the Event Label. Click on ‘Second dimension’ and then choose ‘Event Label’ (you can free type it or click under ‘Behavior’.

Step 12: It will then show you attempts and conversions by location - ER Express automatically injects the location name.
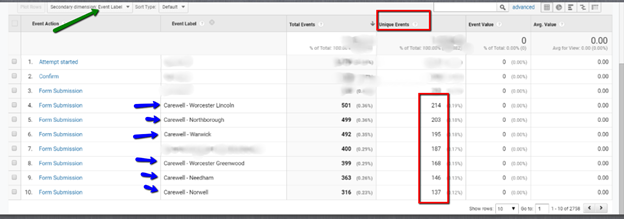
Step 13: If you have more than 5 locations, you will have to click 'Show rows' and increase it from the default setting of 10 rows. Set the number of rows to twice the number of locations you have since you will need to see two rows of events for each location – one for the attempt and one for the submission.

Custom Reporting – if you want to run a regular report
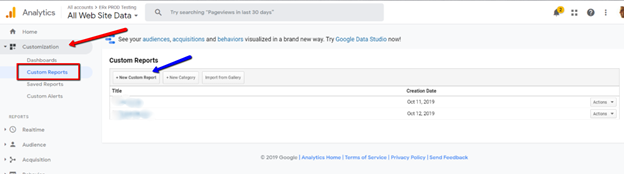
Step 14: In the left sidebar, click 'Customization' and then 'Custom Reports' and then click on 'New Custom Report'.
Step 15: Give the report a name.

Step 16: Then name the first tab - we recommend 'All locations' because this tab will aggregate data across all locations.

Step 17: Under Metrics Groups, click 'Add metric group'.
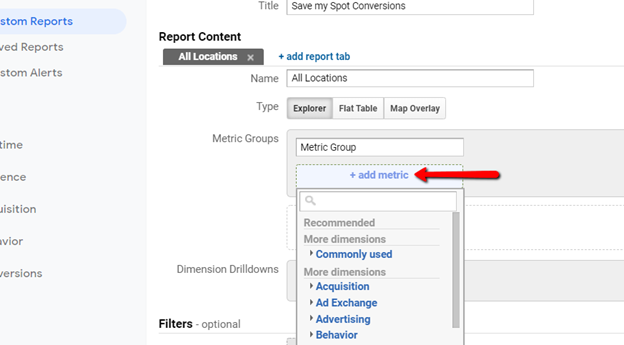
Step 18: Choose Unique Events.
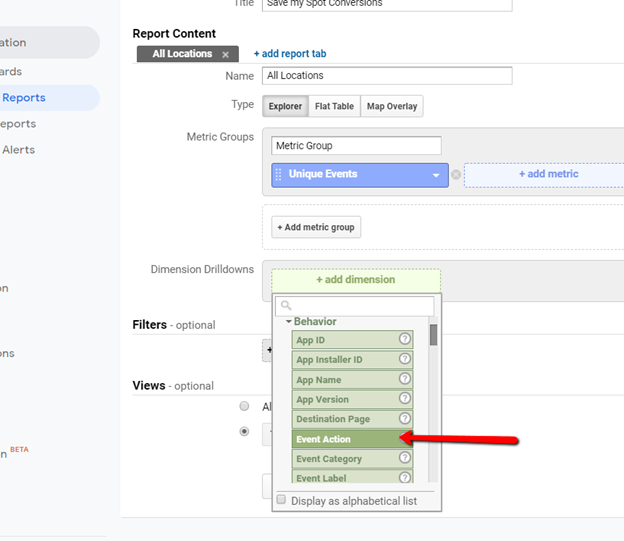
Step 19: Then click 'add dimensions'.
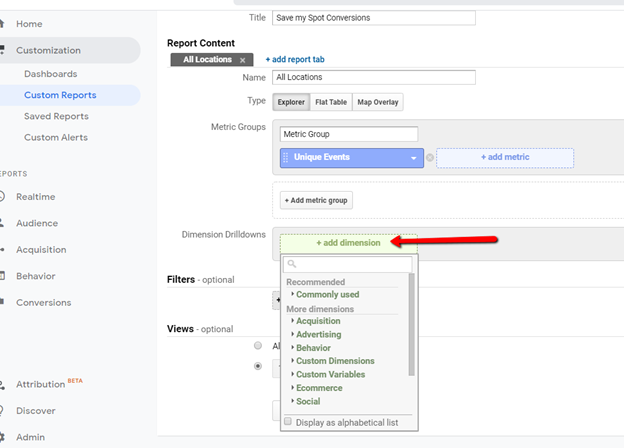
Step 20: Choose 'Event Action' under Behavior.
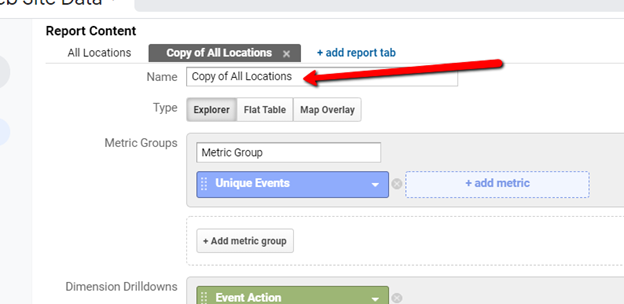
Step 21: Almost done! Now click 'Duplicate this tab'.
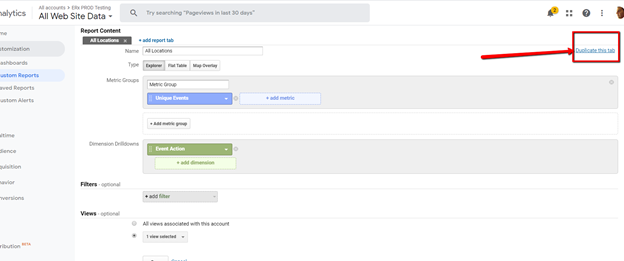
Step 22: Change the name from 'Copy...'
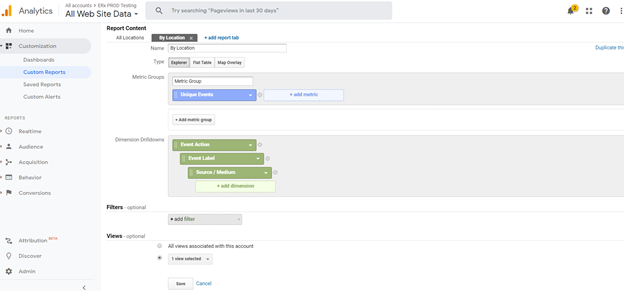
Step 23: To 'By Location' – so now you will have two tabs.
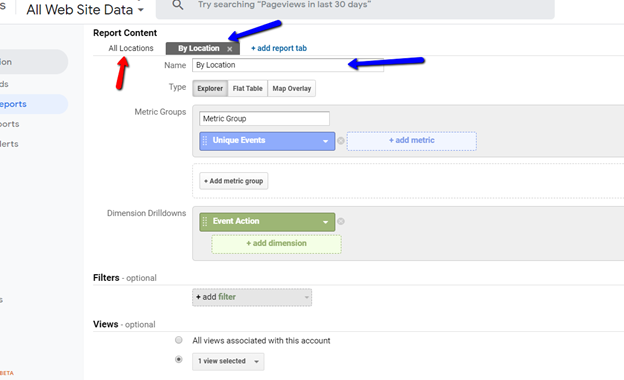
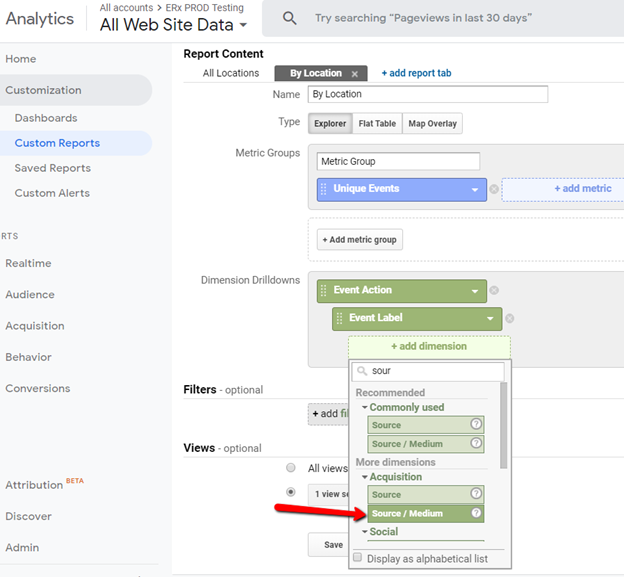
Step 24: To show data by location, click ‘add dimension’ under ‘Dimension Drilldowns’ and this time choose Event Label. ER Express automatically injects the name of each location into this dimension.

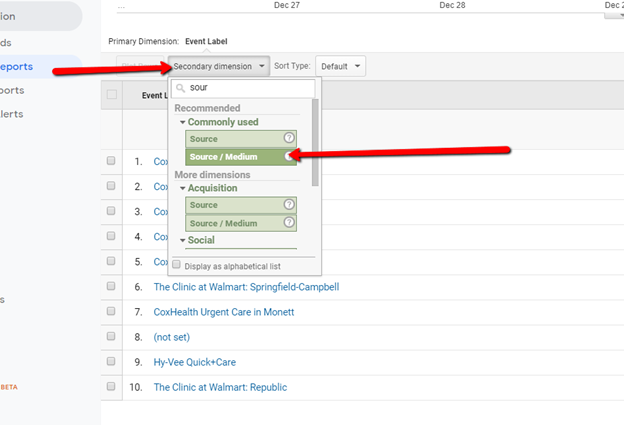
Step 25: Then also add 'Source/Medium' so you can see attribution data - like whether traffic comes from Facebook or organic search.
Step 26: So here is what the 'By Location' tab looks like:
Step 27: Now go back and add the 'Source/medium' dimension to the All Locations tab (we did not do this earlier so our dimensions would be ‘stacked’ in the order of Action > Facility > Source but you can certainly change this order to better fit your reporting needs).
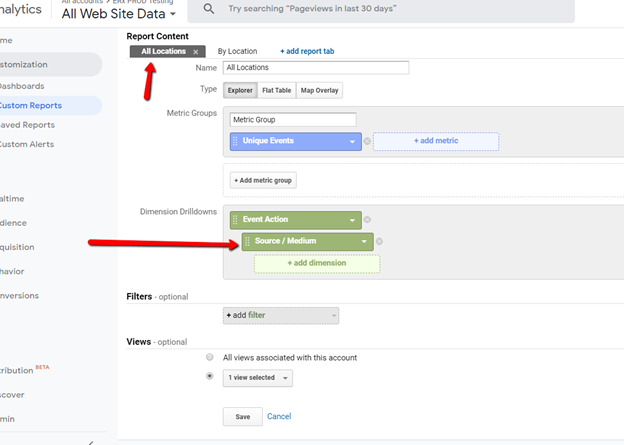
Step 28: Here is what tab 1 will look like:
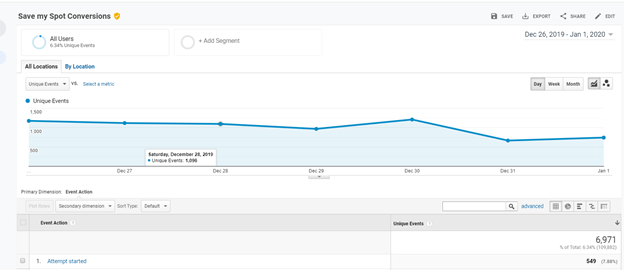
Step 29: Click into the event to then see the source of traffic.
Step 30: Here is what the second tab will look like - it breaks down the data by location.
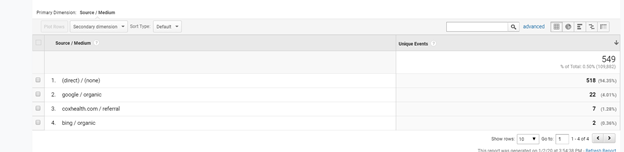
Step 31: You can add a Source/Medium as a secondary dimension...
Optional Steps
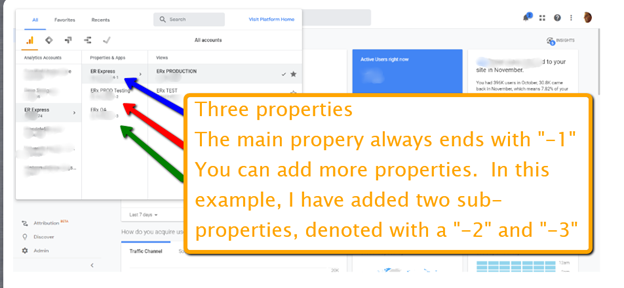
Option 1: Create dedicated property for tracking ER Express-related traffic
Why do it?
-
Enables you to do easily segment and separate your data related to ER Express
-
Some customers will put all 3rd party traffic into a secondary property or create multiple secondary properties for each vendor. For example, they may put all traffic for scheduling for ER / urgent care in one property all traffic for specialty care in another. Or they may put all scheduling traffic in one property and all traffic related to billing inquiries in another.
Are there any drawbacks?
-
The main drawback is that Google limits you to 50 secondary properties.
-
The other drawback is that you need to manage some settings at the property level. For example, if you set up cross-domain tracking for ER Express, you will need to remember to create it for the secondary property.
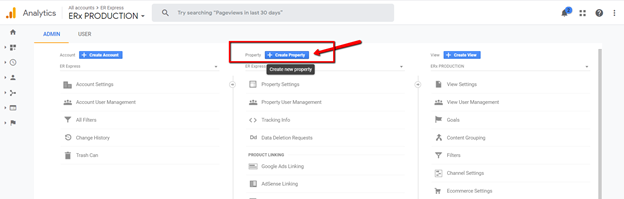
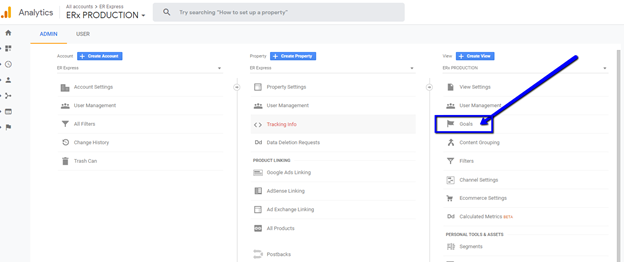
Step 32: Click on the Admin Gear in the left sidebar.

Step 33: In the middle column, click 'Create Property’.
Step 34: Choose 'Web' (the default).

Step 35: Give this property a name.
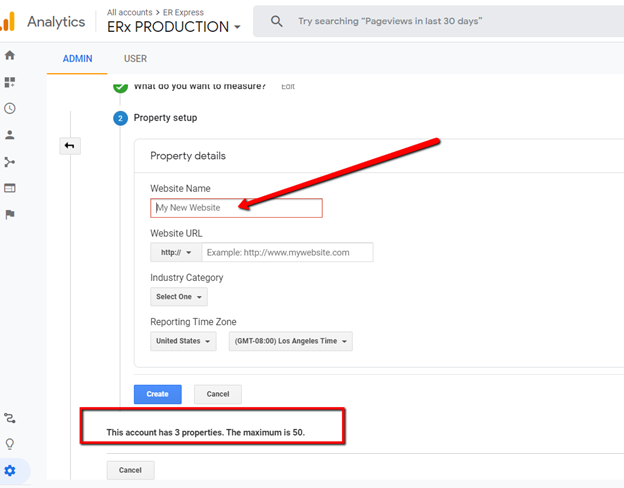
Step 36: Then, when you login, you will toggle to the specific property.
Setting up Goals (not recommended, but some customers have asked, so here it is)
1. From any page in Google Analytics (in this example, I’m on Google Analytics Home), click on the Admin (the gear icon) in the lower left sidebar menu.

2. In the Admin page, click on ‘Goals’ in the View column.
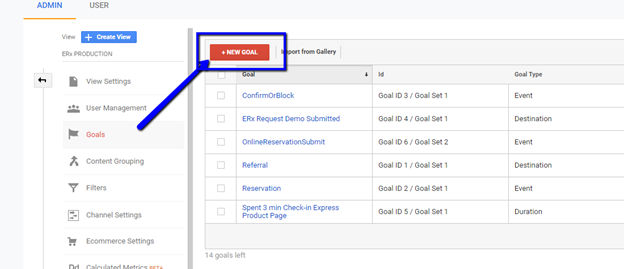
3. Click on the ‘NEW GOAL’ button.
4. Now you will set up your goal. Start by choosing ‘Make an appointment’.

5. It will give you the default goal description ‘Make an appointment’.

6. Change the Goal Description from the default to ‘Save my Spot’ (note: we recommend this name for consistency, but you can choose any name you want).
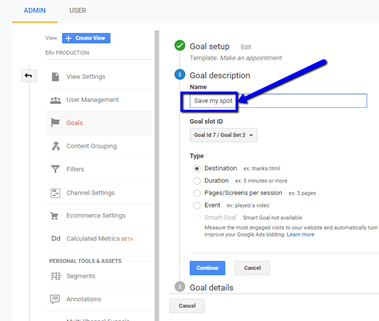
7. Choose ‘Event’ for the type (instead of Destination).
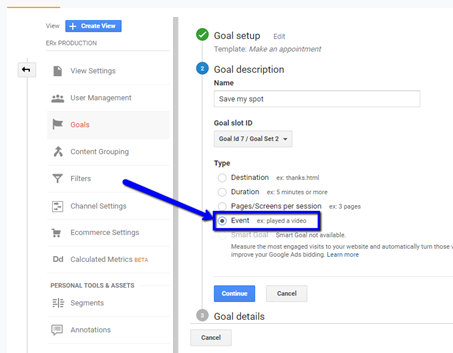
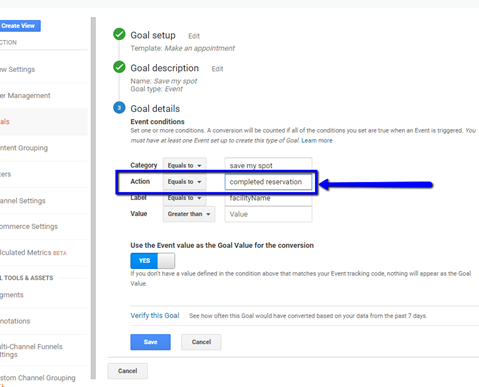
8. When you click ‘Continue’ you will then move into defining the Goal Details.
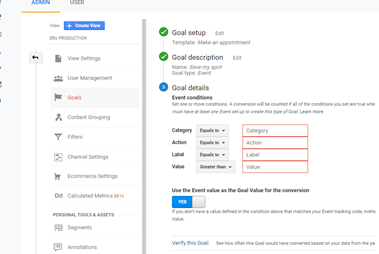
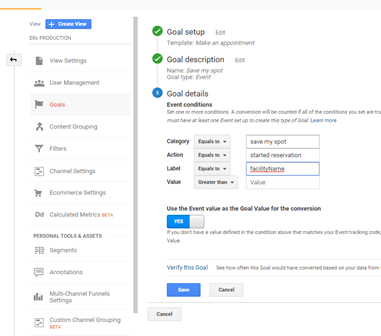
9. Fill in the Category = save my spot, the action = started reservation, and then label = facilityName. This event is for the top of the funnel – the patient has opened the reservation form but not submitted it yet. The facilityName is a variable that ER Express will automatically inject based on for which hospital / clinic the patient is making a reservation.
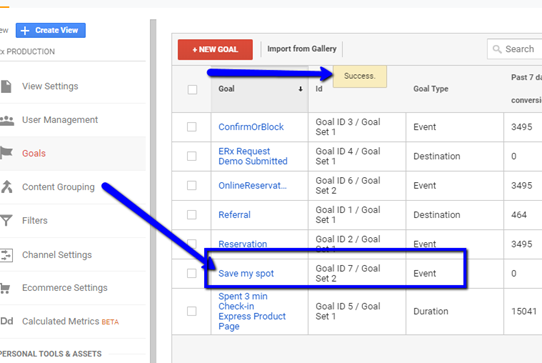
10. Once you click ‘Save’ you will return to the Goals page. You will see a success message and your goal in the list. You have created the ‘attempt’ event.
11. Now repeat the process, but this time set the event action = completed reservation instead of started reservation. This event will get triggered only when the patient clicks the ‘Submit’ button on the reservation form.
FAQs - Basics
-
Do I need to do anything just to receive the data? The only thing you need to do is provide ER Express with your GA property ID. If you want to set up one or more secondary properties, please see below for more detail on how to do so.
-
Can I use GA’s conversion calculation? It uses the wrong denominator – it divides your goal event by the total number of sessions that your website has received, which makes your conversion rate skew low. More here: https://www.optimizesmart.com/fundamentally-wrong-conversion-rate/
-
Why can’t I just divide by the number of users or sessions? Sessions does not actually match how many patients click into the reservation form. More here: https://support.google.com/analytics/answer/4588315?hl=en
-
Do I need to create a Goal? No – that is why we use Events.
-
Are there limits to the number of Goals I can create? Yes – another reason not to use Goals.
-
Do I have to call my Event ‘Save My Spot?’ No – this is the recommended standard, but you can use Online Reservation, Hold my Spot, etc. We recommend NOT using something general like “Online Appointment” because many health systems have many different kinds of online appointments.
FAQs – Advanced
- I am running paid campaigns on Google Ads, Facebook, etc. What do I need to do? We will add those tracking mechanisms to the reservation page. See our separate guides for more detail, but in short, we just the Google Ads Account ID and the Facebook tracking pixel. For Google Ads, if you create your goal in GA and then pull it into Ads, you do not need to take any further steps. If you create your conversions in Ads, then we need two pieces of information: your Google Ad account ID and Conversion Label. More on the pros and cons of these approaches later.
- I have multiple campuses. Should I have a conversion label for each one? We generally recommend NOT creating separate conversions (and consequently, conversion labels) for each campus. We recommend a single conversion and then organizing your campuses into separate campaigns, or even a single campaign with a separate ad groups for each campus. If your health system is a true multi-region or multi-state entity, that it may make more sense to have separate conversion labels for each region.
- Do you handle other types of campaigns? Just tell us what you want.
- I have a marketing agency running a campaign and want to send some data to their GA property and some to ours. Can you handle this situation? Yes, we handle it often. It takes a little bit of consultation to make sure we send the correct data to the correct property.